Start at business.apple.com, not the old Apple Business Connect address. Sign up, verify your organisation, then claim or add each location’s place card. Core listing management costs nothing; Apple Ads for extra visibility on Maps is optional and billed separately. Most businesses finish verification and publish their first listing within a few days.
TL;DR:
- Verification through document upload is the most common method and can take up to five business days, with delays usually caused by mismatched details.
- Claiming or adding locations requires exact business name, full address (no PO boxes), and correct categories, with map pin accuracy crucial for customer directions.
- Managing multiple sites benefits from a structured hierarchy and scoped permissions, since migrating to the new portal is permanent and cannot be reversed.
- Apple Ads for promoting your listing are optional and should be tested with a small budget after initial verification; most effective listings rely on optimization rather than paid promotion.
- Regular review and response to customer feedback, as well as maintaining accurate hours and contact details, improve trust and prevent negative reviews caused by outdated information.
Table of Contents
- How to complete Apple Business Connect setup in one session
- How do you sign up for Apple Business and verify your organisation?
- How do you add or claim a location on Apple Maps?
- Verification methods for locations and how long they take
- Completing and optimising your place card
- Roles, Managed Apple Accounts and the move away from legacy portals
- Promoting your listing and what it actually costs
- Migration and troubleshooting checklist
- Managing and responding to customer reviews and feedback via Apple Business Connect
- Understanding privacy and data security for your business information
- SemLocal perspective: why Apple Business matters in a multi platform local strategy
- Let a specialist agency handle your Apple Business listing while you run the business
- Sources
- FAQ
How to complete Apple Business Connect setup in one session
Apple Business Connect has been folded into a single portal called Apple Business, which now handles both device management and public location listings. If you’re starting fresh, work through this order:
- Sign in with an Apple ID at business.apple.com (a business email address is best).
- Create your organisation profile and submit it for verification.
- Search for your business, then claim an existing place card or add a new location.
- Fill in hours, photos, categories and attributes, then publish.
- Once the listing is live and settled, consider testing Apple Ads.
Each step unlocks the next, so don’t skip verification hoping to edit your listing early. Apple won’t let you publish changes until your organisation status clears.
How do you sign up for Apple Business and verify your organisation?
Sign-up happens at business.apple.com using an Apple ID. Use a business-address Apple ID rather than a personal one where you can. It saves confusion later if the person who set everything up leaves the company, since access is tied to whoever holds that ID.
Before you start, gather the organisation details Apple asks for:
- Your registered legal business name, matching official documents exactly.
- A physical address (no PO boxes) and your tax ID or registration status.
- Your billing currency and time zone, which affect Ads later, not just display.
Apple offers a few verification routes depending on your business type. Document upload is the common path, where you submit something like a utility bill, lease agreement, or insurance certificate showing your business name and address. Domain verification through a DNS TXT record is available for organisations that want to confirm ownership of their website. Some flows use phone verification instead, particularly for single-location businesses.
Apple’s own guidance states that document-based verification can take up to five business days to process. Delays usually come down to mismatched details rather than Apple being slow.
Pro Tip: Before you submit anything, check that your business name, address and phone number match exactly across your website, your bank statements and any document you upload. Even a missing “Ltd” can trigger a manual review.
How do you add or claim a location on Apple Maps?
Search for your business name and address inside Apple Business before doing anything else. If a place card already exists, usually built from third-party mapping data, you claim it. If nothing comes up, you add a new location from scratch.
Adding a new location requires:
- Your exact business name as customers would recognise it.
- A full street address (again, no PO boxes accepted).
- A working phone number and website URL.
- The correct primary business category, plus any relevant secondary categories.
Once the basic details are in, drag the map pin yourself rather than trusting Apple’s automatic placement. Pin accuracy at the actual entrance, not just somewhere on the correct street, matters for anyone using Apple Maps for walking or driving directions. A pin dropped on the wrong side of a building sends customers to a car park instead of your front door.
If you run more than one site, Apple Business supports a brands and locations structure rather than forcing you through the single-location flow repeatedly. That structure becomes worth setting up once you’re managing more than a handful of addresses.
Verification methods for locations and how long they take
Phone verification tends to be the quickest route: Apple calls or texts a one-time PIN to the number listed on your place card, and independent guides note this works well when the listing already has a working number attached. If there’s no reliable phone match, Apple falls back to document review.
Document verification typically takes one to five business days once submitted, matching the same window Apple states for organisation verification. Domain-based checks using a DNS TXT record apply mainly at the organisation level rather than per location.
If verification stalls past that window:
- Recheck that your business name, address and phone number match across every document.
- Re-upload documents as clear, uncropped scans rather than phone photos with glare.
- Confirm the phone number on file actually rings through to someone who can answer for a PIN.
Most rejections trace back to inconsistent data rather than anything wrong with the business itself.
Completing and optimising your place card
Once verified, you can edit the fields that actually influence discovery: business description (kept within Apple’s character limit), regular and special hours, photos, categories, attributes, and services or menu entries. Apple’s own documentation confirms these fields go through a review step before appearing live on Maps.
For optimisation that genuinely moves the needle:
- Upload a real photo set, exterior, interior, team, products, rather than a single logo image.
- Write a concise, specific description instead of generic marketing language.
- Double check your primary category matches how customers actually search for you.
- Add booking links or Apple Pay support where your business type allows it.
Preview changes inside Apple Business before publishing, then check the live listing on Apple Maps a day or two later to confirm everything took effect.
Pro Tip: Treat your place card like a shop window, not a form to fill in once and forget. Revisit hours around holidays and update photos seasonally if your business changes look throughout the year.
Roles, Managed Apple Accounts and the move away from legacy portals
Assign ownership to a role tied to the business, ideally a Managed Apple Account, rather than one employee’s personal Apple ID. A Managed Apple Account belongs to the organisation, so access survives staff changes cleanly.
Handle roles like this:
- Set one primary administrator using a business-domain Apple ID.
- Add additional users with scoped permissions rather than full admin rights for everyone.
- Review who has access periodically, especially after staff turnover.
One detail catches people out: signing in with a legacy Apple Business Connect or Apple Business Manager account migrates the organisation into the unified Apple Business portal permanently. There’s no reverting to the old separate portals afterwards.
Promoting your listing and what it actually costs
Claiming, verifying and managing your place card costs nothing. Apple Ads on Maps is the only paid layer, and it’s entirely optional.
If you do want to test Ads:
- Enable Ads settings from inside Apple Business once your listing is live and stable.
- Set your currency and time zone carefully first, since Apple warns these are difficult to change once billing starts.
- Run a small test budget before committing to an ongoing spend.
- Consider paid promotion for competitive categories or seasonal peaks, not as a default from day one.
A free, well-optimised listing often does most of the work before you need to spend anything on Ads.
Migration and troubleshooting checklist
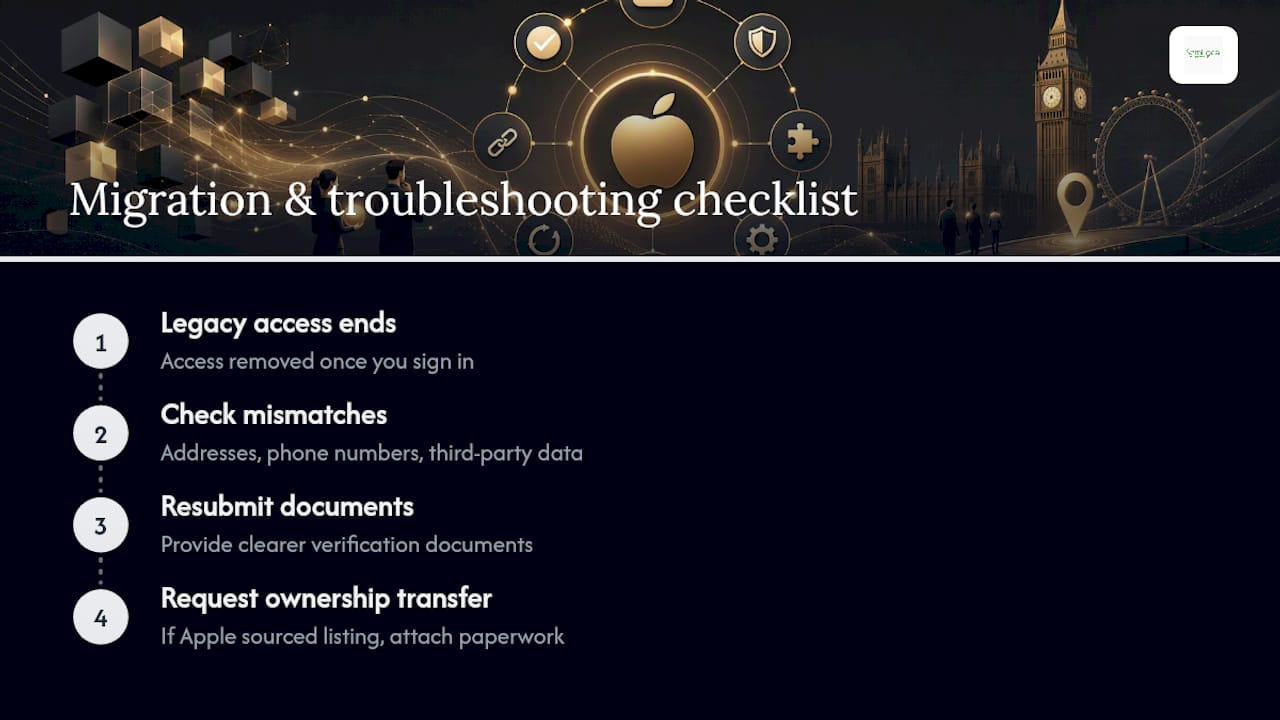
Remember: moving to Apple Business is one-way. Legacy Apple Business Connect access disappears the moment you sign in. If publication stalls, check for mismatched addresses, phone numbers or conflicting third-party data first. Re-submit clearer documents, and if Apple sourced your listing from elsewhere, request an ownership transfer with supporting paperwork attached.
Managing and responding to customer reviews and feedback via Apple Business Connect
Apple Maps reviews sit differently to how they work on other platforms. Ratings and written reviews come from Apple Maps users directly, and your place card surfaces that feedback alongside your other listing details once your location is verified and published.
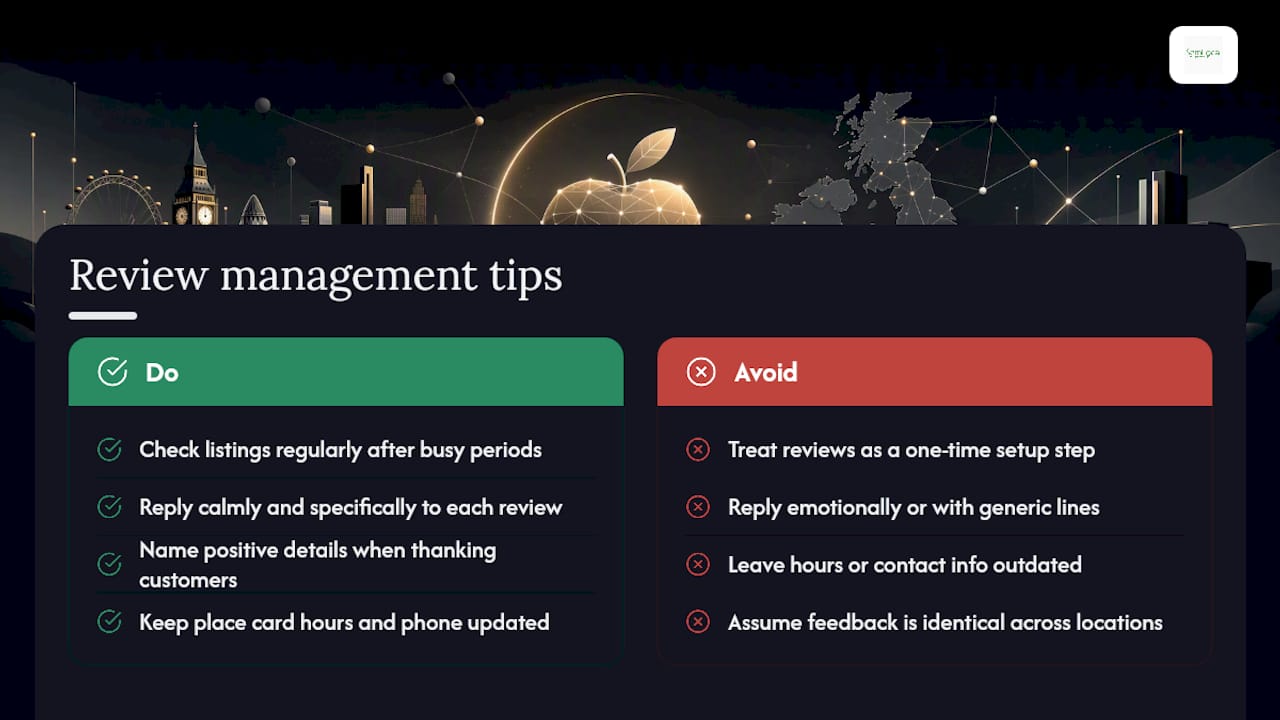
Treat review management as an ongoing task, not a setup step you tick off once. Check your listing regularly for new reviews, particularly after busy periods or after you change something significant, like hours or services, since customer feedback often reacts to recent changes.
Responding professionally matters even when a review stings. A calm, specific reply, thanking a happy customer by naming what they mentioned, or addressing a complaint with a concrete fix, does more for trust than a generic thank you. Prospective customers reading your listing later see both the review and your response, so treat every reply as public-facing, not a private message to one person.
Keep your place card details accurate, since outdated hours or a wrong phone number tend to generate frustrated reviews that have nothing to do with your actual service quality. A surprising number of negative Apple Maps reviews trace back to a customer turning up when the business was actually closed, because the hours field hadn’t been updated.
If you manage multiple locations, check each one’s reviews separately rather than assuming feedback patterns are the same across sites. A branch with a parking problem will accumulate different complaints to one with a booking system issue, and lumping them together in your response strategy misses what’s actually going wrong at each address.
Understanding privacy and data security for your business information
Your Apple Business listing is public by design. Anything you enter, address, phone number, hours, photos, becomes visible to anyone searching Apple Maps, so treat the setup process with the same care you’d give a public-facing website.
Verification documents are a separate matter. Utility bills, leases and insurance certificates submitted during sign-up go to Apple for review purposes only, not for public display, but it’s still worth redacting anything unrelated to proving your business identity, account numbers or unrelated personal details, before uploading.
Access control is your responsibility, not Apple’s. A Managed Apple Account with scoped permissions limits who inside your organisation can edit sensitive fields like your legal address or tax status, which matters more than most owners initially assume. A former employee retaining admin access to your business listing after leaving is a genuine exposure, not a theoretical one.
Be deliberate about who you connect to your listing through third-party integrations, booking systems, payment links, menu platforms, since each one is effectively another party with some access to your business data. Review those connections periodically the same way you’d audit any other software with access to customer or business information. Apple’s documentation focuses on what you can control on your side; the security of any linked third-party service is a separate check you need to run yourself.
SemLocal perspective: why Apple Business matters in a multi platform local strategy
Apple Business shouldn’t be an afterthought behind Google Business Profile. Millions of customers search and navigate exclusively through Apple Maps, so a thin or unclaimed listing there is a gap competitors can quietly exploit. Keep your hours, address and categories consistent across both platforms, mismatched signals confuse ranking systems as much as they confuse customers. Treat Apple Ads as a small, measured test, not a default spend, and let the results steer your listing content rather than the other way round.
— Geoff
Let a specialist agency handle your Apple Business listing while you run the business
Setting this up properly, verification, place card fields, ongoing review management, takes real hours most owners don’t have spare, especially across more than one location. A specialist agency manages your complete local presence end to end, so your Apple Maps listing gets the same attention as your Google Business Profile, without you chasing verification emails between customer calls.
For multi-location businesses specifically, bulk verification workflows and consistent data across every branch are where DIY setup tends to fall apart, addresses drift out of sync, one location’s hours never get updated, a claimed listing sits unfinished for months. A managed service catches those gaps before they cost you bookings. If you’d rather have someone else own the ongoing optimisation, from photo refreshes to review responses, get in touch through SemLocal’s lead generation service or explore AI Management Agency’s services to see how a managed local presence fits alongside your existing marketing.
Sources
- Better Business Management Ahead – Apple Business
- Sign up for Apple Business – Apple Support
- Apple Business – Apple
FAQ
How do I set up Apple Business Connect?
Sign up at business.apple.com, verify your organisation using document upload, phone, or domain verification, then claim or add your location and complete the place card before publishing.
How does Apple Business work?
It combines organisation verification with location management: once verified, you edit fields like hours, photos and categories on a place card that appears to customers searching Apple Maps.
Is Apple Business Connect worth it?
For any business wanting accurate visibility on Apple Maps, yes, it’s free to claim and manage, and an unclaimed or outdated listing risks losing customers to competitors who’ve bothered to fill theirs in properly.
Is Apple Business Connect free?
Core listing management costs nothing. Apple Ads, the paid promotion option on Maps, is entirely optional and billed separately once you choose to enable it.